Saturday, April 30, 2011

What I have been crocheting

I just discovered this awesome thing on Ravelry.  You can subscribe to feeds and see what people have been working on.  I thought, "WOW!  that is really cool!  How can I make that work for me?"

Then I decided to figure out how to embed that on a page so that all of you can see what has inspired me to pick up my hook.  Hopefully this will work!

Error: Embedded data could not be displayed.

and now you know what I have been working on!

Until next time,

Wednesday, April 13, 2011

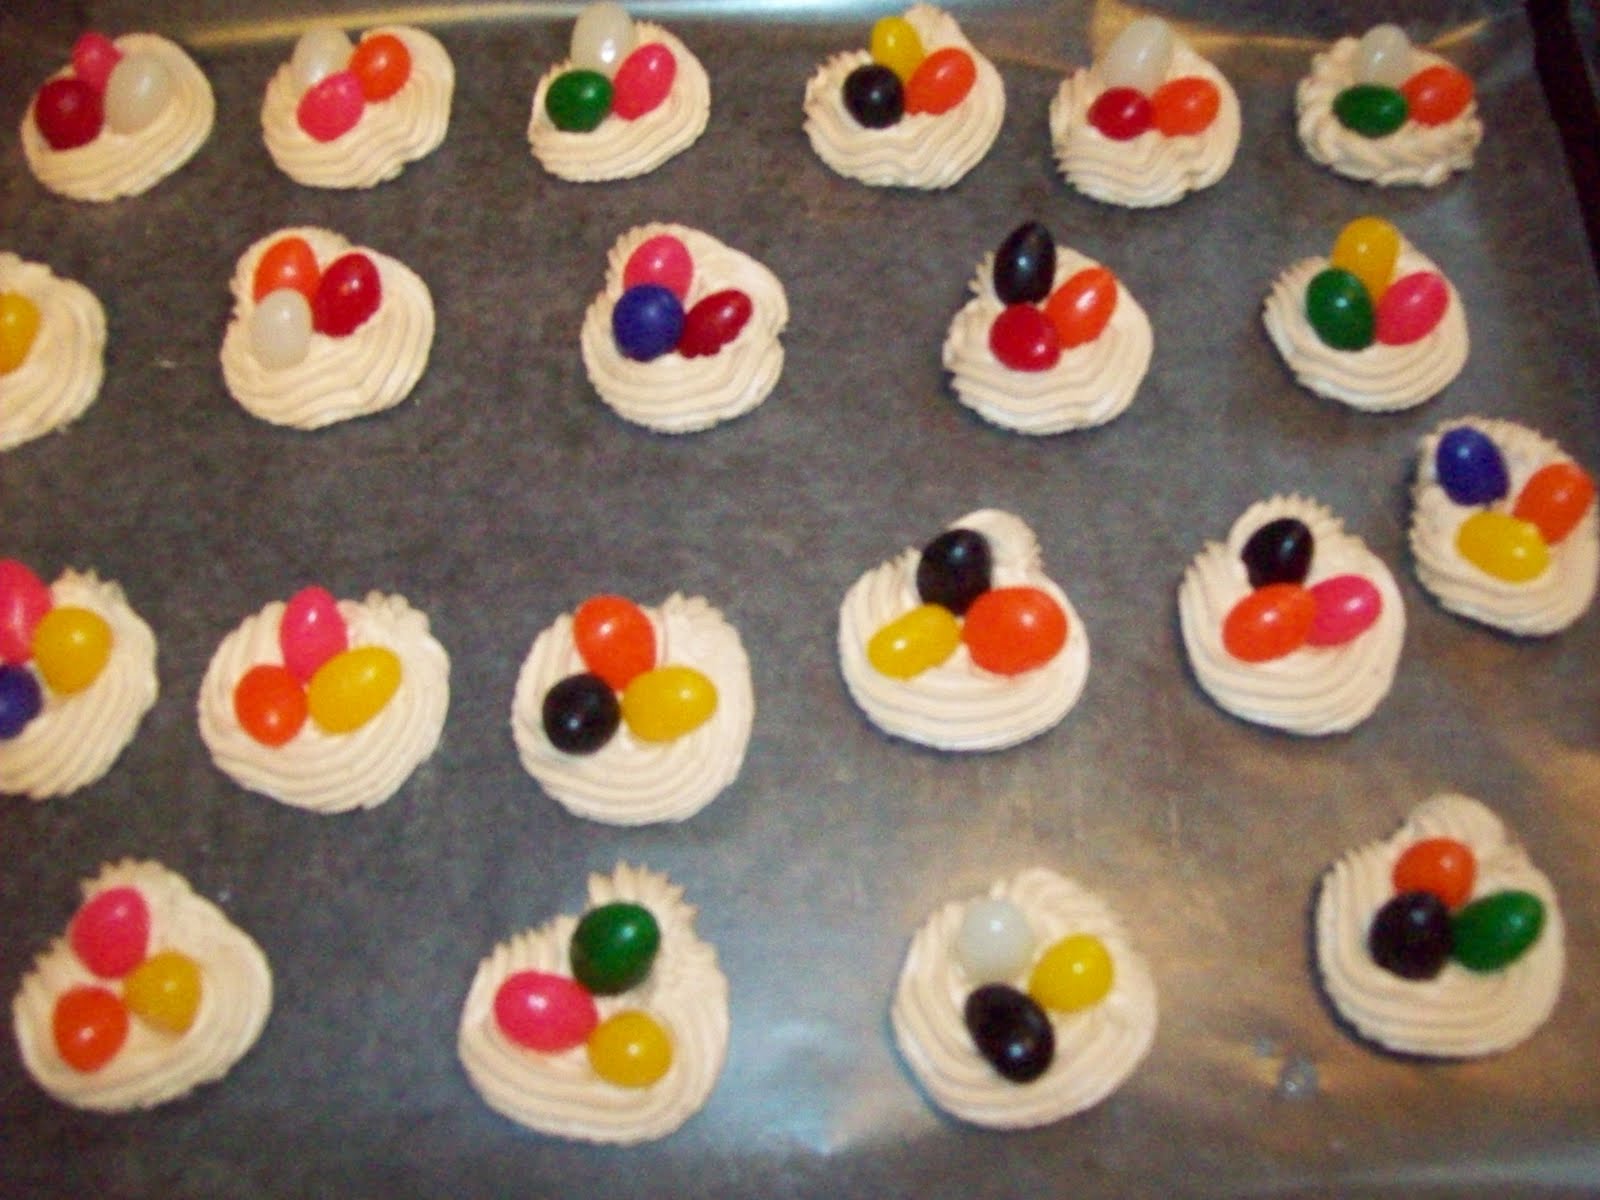
birds nest candies

I am currently working on a few pattern designs, Princess A was sick last week, Little Man J was sick over the weekend which meant that Momma Sunflower was sick yesterday.  How is it that my little sunflowers don't want to share doing dishes, doing laundry, vacuuming, yard work etc but they are SO willing to share illness?!  Just doesn't seem fair!

Anyway, today all felt better so I got to make these little goodies:
I made them as a small treat to stick in the kids lunches, but I can see them on the tops of cupcakes as well.  I wish that the "nest" color were a darker brown (it is darker in real life but not as brown as I would like) and anyone with ideas on how to get a richer brown with food coloring please share! Also, I KNOW these are terrible pictures.  It has been overcast and rainy for several days now and I just got tired of waiting for a pretty day.  When they were pretty we were sick so I just went for it.  Besides, the pics just give you an idea of what to expect, I am sure yours will be lots prettier!  If you want to make your own here is how to do it:

You will need:
1 Tablespoon .Meringue Powder  (Yes, I am a chicken and I don't use egg whites!)
2 Tablespoons warm water
1 cup confectioners sugar
decorating tip #18 or a large star tip
decorator coupling
ziplock bag or decorating bag
jellybeans
food coloring in yellow, green and red

In a stand mixer add meringue powder, warm water and sugar.  Add food coloring to get brown.  My box said 6 drops yellow, 5 red, and 3 green.  Beat until stiff peaks form (took about 4-5 minutes for me)  Don't worry, when I first made this I thought, "there is SO not enough water for this to work!".  Trust me, there is!  It will look like this:
Using the coupler attach your star tip to your bag.  If you are using a baggy be sure to use a large one and one of good quality.  I discovered that walmart sandwich baggies just can't stand up to the pressure and develop small pinholes leaving you with a bunch of spaghetti icing strings coming out of your bag everywhere but very little icing coming out of the tip!  It was a messy learning experience but one I am happy to pass on to you.  Back to the directions.  Spoon your icing into your bag and squeeze it to the bottom.  Twist the top to keep the icing from coming out the back.

Next squeeze out about 25 circle shapes onto some waxed paper.  I tried to just hold the tip in one spot and let the icing balloon out around the tip but I think it looks better if you just squeeze out a circle instead.  Don't worry if you leave a small hole in the center, it will disappear in the next step.
Finally, just add some jelly beans to the center of each nest.  Be sure to push them down into the icing so they are nice and secure.  
Set aside and let them dry.  When they dry they are very hard and as such they pack well in lunches.  

In the meantime enjoy!


Until next time,

Friday, April 1, 2011

And the winner is....

Lissa who said,"This sounds like a wonderful game for my daughter!"  Look for an email today so I can get your address and mail your game to you!

If you didn't win, don't be sad.  I have a consolation prize for you.  Today only on the Discussions tab of the Sunflowers At Home Facebook page you can print a copy of the Tammy Tooth pattern


And if you missed the pattern, or just don't want to make one yourself, you can order one through my Etsy shop (Link over there ---------> )


Until next time,

Tuesday, March 29, 2011

Try it Tuesday - handprint tree

Okay, so I know I posted on Facebook that I had a new pattern coming for you this week but there was a minor mishap and that may be postponed. I had it all worked up but the top/closing section and had set it down in my usual project storage space (read on the floor between my chair and Mr. Sunflowers chair). Then it happened.....

Mr. Sunflower and Princess A were having a tickle fight in his chair. Princess A had her trusty blanky with her and it went flying through the air onto our side table where my ever present iced tea was minding its own business. The blanket picked a fight with the tea and the tea dove off the table to escape the attack. Unfortunately at the bottom of the dive was the entire skein of white yarn and poor Tommy Tooth in his final stages of birthing!

The yarn was successfully rescued with no ill effects, however it is currently recovering (meaning it was rinsed thoroughly and all the tea was removed with no signs of staining but it is still wet and airing out.) Tommy however, was not so lucky and at 7:59 pm he gave up his life due to injuries beyond this persons capability to repair.

The good news is that he had a brother. His brother is a bit shy but he will hopefully make an appearance by the end of the week. In the mean time I wanted to give you some inspiration.

I come across so MANY wonderful ideas while browsing the internet and my bookmark list is full of projects I want to make. I decided it was time to start moving them from my want to list to my the have made list and to bring you along on the journey. This week I made a project that was featured on At Second Street here.


I was really excited about this one and when I saw it I had to go to Hobby Lobby to get some burlap. I just knew I had brown and green material at home in my stash and I already had an 8X10 canvas I picked up at Big Lots. I got home, kidnapped Mr. Sunflowers staple gun and stapled the burlap to the canvas. Then I taught Princess A how to trace her hand, which let me tell you she thought that was the neatest thing ever! I think I ended up with about 50 hand tracings before she finally became disinterested and wandered off to play with some homemade playdough and her cookie cutters.

Then I raided my material stash, found what was left of my brown material from some turkey table decorations I made here. And a few years back I made a wall hanging using some green fat quarters and I was sure that I had some material left. Problem was that my yarn stash didn't yield any leaving me greenless! Booo! So I headed to the closest store that might be useful. You know, the one with a big yellow smiley face as their logo. Now mine doesn't carry fabric so this was going to be interesting. I did find two bandanas, one entirely green and the other was blue on one end fading to green then yellow on the other. These became my leaves.

And here is the final project:


Until next time,

Tuesday, March 22, 2011

Pot of Gold

I know it is a bit late for St. Paddy's crafts but I really wanted to share these cute little table decorations that I made for the tables at church.  The little leprechauns are from Wee Folk Art and the directions can be found here.  When I first saw them I knew I had to make them.  I had a set sitting on my hall shelf as my March decorations and started thinking that they were missing something.

Then I saw this post over on Canadian Living and something in my head clicked and these little pots of gold were born.  While they are really rather simple to make I thought I would share the directions with you. 

You will need:
a rainbow pack of Chenille Stems,
baby storage cups (I got these at the Dollar Tree but any 1/2 cup storage container in the right shape will work,
cotton balls,
black paint
cardstock (not shown)
paintbrush (not shown)

Directions:
First toss all the lids into the junk drawer to be raided later for a recycle craft, you don't need them for this project.  Paint the outsides of each container with the black paint.  I know the picture shows the rims painted on the inside but I discovered that it really wasn't necessary.  Allow them to dry and then add a second coat of paint.


(Yes that is a plastic bag under my painted cups.  Didn't want to move the tablecloth or paint it so I used what I had on hand as a drop cloth!)
If you want a shiny pot I would suggest adding a coat of clear spray paint after the black has dried.  This may help prevent scratches appearing on the paint also.  That is just a guess but it sounds good right?!

Once you pots have dried, or even while you are waiting for them to dry if you are in impatient crafter like I am, go turn on your glue gun and grab your chenille stems.  You want to line up your stems so that they are even and they are in the correct color order (cuz mine are NOT in the correct order in the pictures.  Fortunately no on noticed and I am not telling them!).  The correct order is red, orange, yellow, green, blue, violet/purple.  Also cut a cloud shape out of your cardstock.  You want it to be about 1 1/2 -2 inches across but you can really just eyeball it.
Next you are going to pinch the ends together so that they are flat but really tight.


Finally run a bead of glue across this and hold until the glue sets.  To be honest, I usually wet my finger and kind of smoosh the glue down to get better adhesion here.


No flip it over and run some glue along the back side as well to doubly secure the stems.  Repeat for the other end of the stems.

Now, here is the bad news.  H arrived home from school about this time, Princess A awoke from her nap and I had to venture out to pick up Little Man J from school as well as help with homework, start dinner etc.  I tell you this so that you will hopefully understand when I tell you that I had procrastinated on this project and I had to complete it THAT DAY so the rest of the steps were done in the midst of controlled chaos and the camera didn't come out of hiding so I have no more pics.  Even the completed project pics were taken with my phone since I rushed out and forgot my camera when I went to decorate!  Hope you guys have a good imagination for the final couple of steps.  They aren't really hard, so I am sure you can figure it out!

Okay, without bending the stems, find the middle and cut across all the colors of the rainbow so that you now have two six inch rainbow pieces.  I laid them on the counter and gently curved the stems.  Hold in place without pinching tightly and again glue the stems together on both sides.  Your chenille ends will not be a straight line, think more of an angled line with the bottom stem being longer than the top.  You don't need to be neat with the glue on this end since we are going to hide it in the cloud.

Once the glue is dry, stretch out a cotton ball until it is fluffy and glue to one side of your cardstock cloud being sure to cover all of the paper.  It is okay for you cotton to extend past the paper.  Put this side down on the counter.  Place your slanted end of the rainbow on your cloud and glue it in place.  Again fluff a cotton ball and now glue this one over the rainbow and cover the cardstock.  

The final step is to take the unfinished end of the rainbow and hot glue it to the inside of your painted pot.  Taadaaa!

Your pot will be top heavy and won't stand up on it's own.  To fix mine I took some found rocks, painted them gold and hot glued enough into the bottom of the pot to hold it up.  I did this because I wanted the pots of gold to remain standing after the kids at church raided the gold candies so that the grown ups could at least see them!  

On a side note, I wanted to show you my very first leprechauns that I made
I didn't realize that there was a difference between people turnings and Doll Pins  These are made from doll pins that I ended up cutting down to size.  I had to adjust the pattern widths quite a bit, but I still think they turned out cute.  Besides, I am sure leprechauns come in all shapes and sizes despite being magical creatures!


Until next time,


Tip Junkie handmade projects