Showing posts with label free. Show all posts

Friday, May 8, 2020

Friday Features - May 8

I was saddened to read today that the local pool, a popular gathering place for many families with children and teens, has decided not to open this season at all.  It was disappointing given that my state is currently in the process of reopening.  We have one of the lowest number of Covid-19 infections in the country (only 5 states are lower than we are), and yet three weeks before pool season is to open, they have already made the decision to close for the season.

I am sure they put quite a bit of thought into the decision.  Taking in to account the probable decline in attendance, the cost of staffing and maintaining the pool, the difficulty of finding lifeguards when they may be struggling to get certified due to social distancing, not to mention the increased sanitation protocols that may be required.  I doubt the decision was made lightly.  But it is disheartening that while many of us are being cautiously optimistic that we may return to a more normal life in the near future, we are seeing that the new normal may be very different than what we hope for.  Only time will tell. And whichever side of the Covid-19 situation you may be on, I am sure we can all agree that the eventual goal is to find our way back to a life in which our children can play with their friends, we can grab a cup of coffee with our pals face to face, and we can all return to work. 

The news of the pool, though, did get my fingers itching to create something for those summer gatherings, whether it be a day by the pool, a picnic in the park, or a visit to a farmer's market.  So today's Friday Feature is bags galore!  Something to pack your stuff in and bring it wherever you may go.  So without further ado......
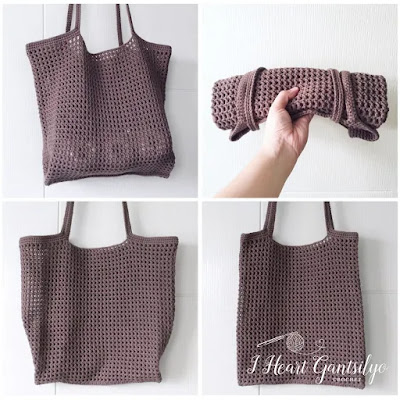


First up is this adorable foldaway mesh bag from Fei at I Heart Gantsilyo.  I have to be honest, I had to look up what gantsilyo was.  It is Filipino for crochet!  Anyways, I love that the mesh is tight enough that small items aren't going to slip through, but it is open enough to not be super bulky.  I also love that it rolls up and secures closed.  That means I can toss it in the back of my car to keep for those spur of the moment Aldi trips.  (For those of you unfamiliar with Aldi, it is a discount grocery store that does not provide free bags.  You either bring your own to pack your groceries in, or you purchase bags from them.)  You can find this pattern here.


I really like the texture on this one, and it is sized to be a great oversized purse, or diaper bag, or whatever you decide to use it for.  And Kat over at Krazy Kabbage includes directions on how to line it too!  You crochet the bottom first and then work the sides perpendicular to the bottom, attaching to the bottom at the end of the rows.   Find this pattern here.


And since I don't want to leave the knitters out, since I am sure you are hungering for some summer bag fun too, here is the Thistle Market bag from Alexandra Tavel of Two of Wands.  This pattern can be easily adjusted smaller or larger.

All the patterns above are offered free of charge.  If you choose to make one, be sure to thank the pattern designer for sharing and let them know I sent you.  Have a great weekend!

Wednesday, May 6, 2020

Foxglove and Friends

It looks like things might be opening up again soon around here.  We are still in phase 1 of the reopening after the Covid-19 pandemic, but I can't help but be excited at the prospect of visiting the park again with the kids.  One good thing that has come of being at home all of the time is teaching the kids some new skills.  My 11 year old has crocheted borders on 4 fleece blankets to donate to God's Tiny Angels, a local organization that collects and distributes newborn and preemie items all over the country. 


She also loom knits, but I really want to teach her how to knit without a loom.  Fortunately a few years back I stumbled upon Foxglove and Friends.  This is a great story curriculum that teaches knitting in a fun, storybook kind of way.  It was created by fellow homeschool mama, Grace Young in 2017.  She graciously offers the year long program as a free download on her site Foxglove and Friends.  I love that it begins with making your very own set of knitting needles!  What a great way to help them to own the craft.  It walks you through how to make a hat, foxglove finger puppet, finch finger puppet, scenery to play with, blanket, and bag to store it all in. 

The program is broken into sections with an adorable narrative story to go with each part.  Directions are clear and easy to follow-not only the pattern directions but the directions for mom to implement the curriculum too!  We are waiting for it to stop raining here so we can find a set of relatively straight sticks for each of the girls to begin their journey.

 It will be my first time trying to teach knitting.  Both of my adult girls learned to crochet. To be honest, for years knitting intimidated me.  I dropped stitches frequently when I was young and was never taught how to pick them back up, so my frustration with the craft grew with every project I had to rip back until I finally just quit.  It wasn't until many years later that I picked up my needles again.  Have you ever taught young children the craft of knit or crochet?  Any pointers you want to share?  I would love to hear them!

Wednesday, March 29, 2017

coupon codes

I forgot to let you know, I am offering 2 of my hat patterns on Ravelry for FREE during the Lent season.  It is my hope that if you choose to take advantage of this, you will make an extra hat to donate to a local charity organization.  You can view the patterns on my Ravelry store here.  The code is good for my Ellie and Roots hats that I designed last year for the challenge.  To get the pattern for free visit the pattern page, choose "buy it now" and enter 40in40 in the code box. 
Roots hat front

Roots hat top


The Ellie hat


 Until next time,


Monday, March 6, 2017

Week 1, 2017

Week 1 is always a short week in my 40 in 40 challenge, as it starts on Wednesday and therefore only 4 projects need to be made.  This year I am attempting to only use stash yarn for my projects. While I have a large stash, this still makes choosing patterns a bit difficult for me.

I tend to bookmark patterns all year that I come across for baby hats.  Then, every week I select my patterns for the week, and lastly I check to see if I have the right yarn.....In the past, if I didn't then I got had to make a trip to purchase some new yarn.  This year I will have to select a different pattern.....sigh.....

But that wasn't a problem this week.  All 4 hats use worsted weight yarn.  So let me show you what I chose.

My first two hats come from the same pattern, the 2 Hearts Newborn Hat designed by Kelly Forster.  You can find the pattern free on Ravelry.  The first is made using knit and purl stitches to cause the heart to "pop out" of the hat.  The pattern calls for an i-cord at the top of the hat that I chose to leave off.  I worked this in Hobby Lobby's Crafter's Secret yarn in Nosegay. 


The second is my first ever attempt at fair isle knitting.  I have to admit that my go around I left LOOOOONNNNNGGGGG threads between the heart patterns (floats) without tacking them which looked really sloppy and messy on the inside.  So I frogged (rip-it,  rip-it, rip-it  go ahead and say it out loud and you will understand why I call it that!)  it and started over.  In hind sight, I might have done better to simply do this in intarsia (which I have never done before either!).  Still I really like the finished project.  This was worked in the Crafter's Secret yarn in Nosegay and in Red Heart Super Savers in Amythest.


I changed the decreases on the second hat from the written instructions.  The hat I worked in Nosegay had a k2tog at the beginning and end of each dpn.  On my second hat I worked a k2tog at the beginning of each dpn and a ssk at the end of each needle.  You can see the difference below:

k2tog at the begiining and end
k2tog at the beginning and ssk at the end


Ella Bonnet

My third hat for the week was the preemie size Ella bonnet designed by Allison Booker, also available on Ravelry as a free download.  Unfortunately, I misread the materials needed and mine came out a bit different than the designer intended.  The pattern calls for 8 mm needles, which I mistakenly read as size 8 needles, which yielded a much different fabric!  Still I like the outcome, even if it is a bit more open.  And in my defense, I had spent the day shopping and setting up for an American Heritage Girls lock in and was actually working on this hat in the dark while the girls were watching a movie!  I used Simply Soft yarn in off white for this project.  I then worked a 2 stitch i-cord for about 10 inches, attached it to one side of the bonnet and used a G hook to sc around to the other side.  I worked a 2nd 2 stitch i-cord, attached it to this side and the sc around the remaining portion of the hat.

My final hat for week 1 I wanted something quick with a simple, repeating pattern to follow since I hadn't slept much the night before.  Myshelle Cole's pattern, Noah, to the rescue!
Also worked with Simply Soft, this pattern uses a technique I had never done before.  The 2nd hdc is worked around the post of the previous hdc - not the hdc of the previous row, but the one one just worked on the same row.  It gives a unique open weave design.  The entire hat is worked in sc and hdc.  And if you decide to give the pattern a try, be sure to look around her website as she has many other preemie patterns available as well.

So that is what was on my hook and needles this week.  What was on yours?

Until next time,

Monday, March 30, 2015

40 in 40 2015 week 6

I have to say I have been really inspired by the completed hats that have been posted on the Facebook event page!  You are some seriously talented fans!  It was so neat to see that this challenge has benefited people all over the world, including Nova Scotia!

I can't believe there is only one week left.  While I look forward to being able to create in a more relaxed atmosphere, and to tackle some bigger projects, I have to say that I really love the intentional aspect of this challenge each year.  Praying over each item and knowing that I have been able to use the gifts God has given me to help someone else makes this period of Lent really meaningful to me - even when it gets hard to get it all done.

That being said, let me share with you my projects from this past week:

First up is the Aimee Baby Hat.  This is the second time I have made this hat.  The first I used Simply Soft yarn.  This time I used Bernat Baby Sport, a thinner yarn.  Both times the hat turned out to big for a newborn, despite the pattern saying it is sized for newborn to 3 months.  I love the heart pattern that goes completely around the babies head, but I definitely need to spend some time fiddling with my yarn and needles to make it smaller.  14 inches is to big for a newborn.


Next was the Divine hat.  This is available in preemie, newborn and adult sizes - all in the same pattern.  The ridges gently twirl around the babies scalp to come together at the crown.  A quick hat to crochet with beautiful results!


This is the Dania Beanie, available in newborn to toddler sizes.  I admit I am a sucker for the hats with bows!  I would recommend making the starting chain for the bow smaller, as you can see it dwarfs the hat.  Another super simple and quick crochet project.


  My 4th hat for the week is the Sideways Shell Baby hat.  Another quick crochet project.  The designer based the pattern on a Project Linus blanket pattern.  Wouldn't it be cute to make a matched set?


 And then I got on a knit leaves kick!  First up is the Baby Leaves II, which worked up a bit short for me.  So I continued the leaf pattern until after the first decrease on the leaf before beginning the ribbing.  I think I should have used a thicker yarn so that the leaves stood out a bit more.  Since I wasn't completely happy with this one, I tried a different pattern.


This one is the Embossed leaves pattern.  Instructions are given for baby to extra-large adult sizes.  I have to say I was much more satisfied with the way this one turned out.


So that is it for this week.  Only 6 hats to go before this year's challenge is over

Until next time,

Saturday, February 21, 2015

The Ellie

I had some yarn left over after making a photo set for a friend in preparation of the birth of her second child.  Knowing that I was going to be working on the 40 in 40 challenge soon, I decided to play around with it and create a new pattern.  The flower motif above the ribbing is not my own design, it is actually called Flowers in a Row.  I was scrolling through Pinterest and it caught my eye....and the Ellie was born.

 This pattern has not been tested (I just finished writing it Tuesday!) so if you discover an error, please leave me a comment.  And yes, the picture quality definitely leaves something to be desired, but it was late and I wanted to give you some sort of visual to go with the pattern.  :)

The pattern will be available for download from my Ravelry store for FREE until the end of the 40 in 40 challenge this year.  After that time it will be available for a small fee in multiple sizes. Download it now by clicking here.


Until next time,

Saturday, March 22, 2014

Unisex, reversible baby hat

This pattern was the happy accident of my attempt to modify one of the patterns I was making for this years "40 in 40" challenge.  I was using Marianna's Premature Unisex baby hat pattern and decided to work it in the round rather than on straight needles.  It wasn't until I began the decreases that I realized the difference between what I was making and the original pattern.  So this isn't so much an original creation, more a modification.  Still, I thought I would share with you in case you might like it too.


Yarn - Caron Simply Soft
Needles - Size 6, 4.0 mm

Guage    22sts = 4” (10cm)
 
Small Preemie Baby  –  7″ circumference, 3 ½“ high

 Brim (can be worked in a contrasting color) ~  cast on 35

Rnd 1 - knit to end of row
Rnd 2 - knit to end

Rnd 3:  knit to end of row

Rnd 4: * k2, p3   repeat from * to end

Repeat the last row until work measures 2“, 

Shape Top ~
rnd 1:   * k2tog, p3, repeat from *   
         
rnd 2-4:  * k1, p3   repeat from * to end

rnd 5:   *k1, p2tog, p1   repeat from * to end

rnd 6: * k1, p2   repeat from * to end

rnd 7: * k1, p2tog   repeat from * to end

rnd 8: * k1, p1   repeat from * to end

rnd 9:   * p2tog to end

cut yarn and run it through remaining live stitches.  Pull tight and weave in all ends


Medium Preemie Baby  –  9″ circumference, 4 ½“ high
 
Brim (can be worked in a contrasting color) ~  cast on 45

Rnd 1 - knit to end of row
Rnd 2 - knit to end

Rnd 3:  knit to end of row

Rnd 4: * k2, p3   repeat from * to end

Repeat the last row until work measures 3“, 

Shape Top ~
rnd 1:   * k2tog, p3, repeat from *   
         
rnd 2-4:  * k1, p3   repeat from * to end

rnd 5:   *k1, p2tog, p1   repeat from * to end

rnd 6: * k1, p2   repeat from * to end

rnd 7: * k1, p2tog   repeat from * to end

rnd 8: * k1, p1   repeat from * to end

rnd 9:   * p2tog to end

cut yarn and run it through remaining live stitches.  Pull tight and weave in all ends
 
 
Large Preemie / Small Newborn  –  11″ circumference, 5 ½ “ high
Brim (can be worked in a contrasting color) ~  cast on 55

Rnd 1 - knit to end of row
Rnd 2 - knit to end

Rnd 3:  knit to end of row

Rnd 4: * k2, p3   repeat from * to end

Repeat the last row until work measures 4“, 

Shape Top ~
rnd 1:   * k2tog, p3, repeat from *   
         
rnd 2-4:  * k1, p3   repeat from * to end

rnd 5:   *k1, p2tog, p1   repeat from * to end

rnd 6: * k1, p2   repeat from * to end

rnd 7: * k1, p2tog   repeat from * to end

rnd 8: * k1, p1   repeat from * to end

rnd 9:   * p2tog to end

cut yarn and run it through remaining live stitches.  Pull tight and weave in all ends
 
 
Newborn Baby  – 13″ circumference, 6″ high
 
Brim (can be worked in a contrasting color) ~  cast on 65

Rnd 1 - knit to end of row
Rnd 2 - knit to end

Rnd 3:  knit to end of row

Rnd 4: * k2, p3   repeat from * to end

Repeat the last row until work measures 4.5“, 

Shape Top ~
rnd 1:   * k2tog, p3, repeat from *   
         
rnd 2-4:  * k1, p3   repeat from * to end

rnd 5:   *k1, p2tog, p1   repeat from * to end

rnd 6: * k1, p2   repeat from * to end

rnd 7: * k1, p2tog   repeat from * to end

rnd 8: * k1, p1   repeat from * to end

rnd 9:   * p2tog to end

cut yarn and run it through remaining live stitches.  Pull tight and weave in all ends

 
9 – 12 month Baby  – 15″ circumference, 7“ high
 
Brim (can be worked in a contrasting color) ~  cast on 75

Rnd 1 - knit to end of row
Rnd 2 - knit to end

Rnd 3:  knit to end of row

Rnd 4: * k2, p3   repeat from * to end

Repeat the last row until work measures 5.5“, 

Shape Top ~
rnd 1:   * k2tog, p3, repeat from *   
         
rnd 2-4:  * k1, p3   repeat from * to end

rnd 5:   *k1, p2tog, p1   repeat from * to end

rnd 6: * k1, p2   repeat from * to end

rnd 7: * k1, p2tog   repeat from * to end

rnd 8: * k1, p1   repeat from * to end

rnd 9:   * p2tog to end

cut yarn and run it through remaining live stitches.  Pull tight and weave in all ends


Until next time,