Showing posts with label crochet. Show all posts

Wednesday, April 29, 2020

Ear Saver pattern

Like the rest of the country I have been quarantined, 36 days and counting here, and trying to stay busy.  Homeschooling of the littles has continued, despite our state public schools now being canceled for the remaining portion of the year.  The house still needs cleaned and the yard still needs work.  One good thing to come of this is that I have picked up my hook and begun to work on some projects again in between sewing masks for our local hospitals and working up some ear savers.

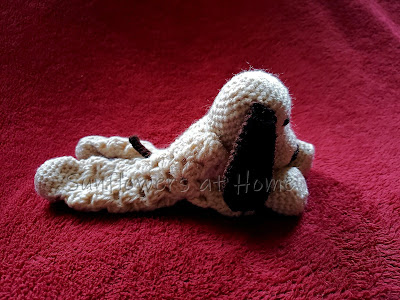
I have also reopened up my Etsy shop.  Recently I made a few of these cute little Peanut the Pups to donate to our American Heritage Girls troop.  Theywill be added to the HUGS bags we make and donate to local foster organizations.  My 2 year old son absolutely loves them and carries them all over the house.  I may have to make him one of his own once things open back up and these actually make it to our AHG group!  You can find Peanut in my Etsy shop if you want one of your own.  Here are a few pics:


Most of what I have been working on, though, are these little ear savers to be worn with the masks that so many are wearing to protect themselves from the Covid-19 virus.  Prolonged use of the masks is causing their ears to become sore.  This little device allows you to hook the ear loops of the mask over the buttons behind your head, thus relieving the pressure on the sensitive skin behind your ears.  They are super quick and simple to work up.  Here is how I make mine....


You will need:
Cotton worsted weight yarn, or yarn of your choice.  
3.75 mm hook (size F)
yarn needle
2 buttons

chain 15 stitches.  Work dc in 3rd stitch from hook and each stitch across to last stitch.  In last stitch work 3 dc.  Turn your work and dc in each stitch on the opposite side.  Your last stitch should be in the same chain as the beginning stitch.  join to top of chain. Weave in ends.  Sew button to each end. 

See?  Super simple!  Stay safe!

Monday, March 6, 2017

Week 1, 2017

Week 1 is always a short week in my 40 in 40 challenge, as it starts on Wednesday and therefore only 4 projects need to be made.  This year I am attempting to only use stash yarn for my projects. While I have a large stash, this still makes choosing patterns a bit difficult for me.

I tend to bookmark patterns all year that I come across for baby hats.  Then, every week I select my patterns for the week, and lastly I check to see if I have the right yarn.....In the past, if I didn't then I got had to make a trip to purchase some new yarn.  This year I will have to select a different pattern.....sigh.....

But that wasn't a problem this week.  All 4 hats use worsted weight yarn.  So let me show you what I chose.

My first two hats come from the same pattern, the 2 Hearts Newborn Hat designed by Kelly Forster.  You can find the pattern free on Ravelry.  The first is made using knit and purl stitches to cause the heart to "pop out" of the hat.  The pattern calls for an i-cord at the top of the hat that I chose to leave off.  I worked this in Hobby Lobby's Crafter's Secret yarn in Nosegay. 


The second is my first ever attempt at fair isle knitting.  I have to admit that my go around I left LOOOOONNNNNGGGGG threads between the heart patterns (floats) without tacking them which looked really sloppy and messy on the inside.  So I frogged (rip-it,  rip-it, rip-it  go ahead and say it out loud and you will understand why I call it that!)  it and started over.  In hind sight, I might have done better to simply do this in intarsia (which I have never done before either!).  Still I really like the finished project.  This was worked in the Crafter's Secret yarn in Nosegay and in Red Heart Super Savers in Amythest.


I changed the decreases on the second hat from the written instructions.  The hat I worked in Nosegay had a k2tog at the beginning and end of each dpn.  On my second hat I worked a k2tog at the beginning of each dpn and a ssk at the end of each needle.  You can see the difference below:

k2tog at the begiining and end
k2tog at the beginning and ssk at the end


Ella Bonnet

My third hat for the week was the preemie size Ella bonnet designed by Allison Booker, also available on Ravelry as a free download.  Unfortunately, I misread the materials needed and mine came out a bit different than the designer intended.  The pattern calls for 8 mm needles, which I mistakenly read as size 8 needles, which yielded a much different fabric!  Still I like the outcome, even if it is a bit more open.  And in my defense, I had spent the day shopping and setting up for an American Heritage Girls lock in and was actually working on this hat in the dark while the girls were watching a movie!  I used Simply Soft yarn in off white for this project.  I then worked a 2 stitch i-cord for about 10 inches, attached it to one side of the bonnet and used a G hook to sc around to the other side.  I worked a 2nd 2 stitch i-cord, attached it to this side and the sc around the remaining portion of the hat.

My final hat for week 1 I wanted something quick with a simple, repeating pattern to follow since I hadn't slept much the night before.  Myshelle Cole's pattern, Noah, to the rescue!
Also worked with Simply Soft, this pattern uses a technique I had never done before.  The 2nd hdc is worked around the post of the previous hdc - not the hdc of the previous row, but the one one just worked on the same row.  It gives a unique open weave design.  The entire hat is worked in sc and hdc.  And if you decide to give the pattern a try, be sure to look around her website as she has many other preemie patterns available as well.

So that is what was on my hook and needles this week.  What was on yours?

Until next time,

Thursday, February 2, 2017

Off the hook....and needles

It has been so long since I have posted that I think my fingers are a bit rusty!  LOL  My first grandchild came to live with us about a year ago, which made me realize that I am not as young as I used to be!  We had to do some adjusting to our home school schedule and I had to do some adjusting to my sleep schedule and crafting fell to the wayside for quite some time.

 Now, however, I think I have found a "groove" for us and my fingers had been itching to pick up a hook or set of needles so before Christmas I managed to make a hat for 2 of my kids and one for my grandchild as well as a mermaid tail blanket.  I had forgotten what a great feeling it is when I complete those final stitches on a project!  So here is a peak at what I accomplished.


It isn't a great picture, but I hadn't really been thinking about sharing online when I was taking Christmas photos, so this is the best I got.  I was able to work it up in about a day.  I made it a few rounds longer since my son enjoys "slouchy" hats.  You can find the pattern, Bankhead, as a free Ravelry download here.


This was a fun knit project.It is called the Etta, also a free download from Ravelry.  Another horrible picture, I know.  It is knit on size 6 needles, and I used a Simply Soft yarn in brown.  I thought the finished fabric wasn't as fluid as I would have liked, but she loved it, and considering she has several brown outfits and hadn't a single brown hat, I think this worked out quite well for her!


I have to admit that this was my favorite hat this year.  I saw it on Pinterest and fell in love.  It isn't a free pattern so I spent several days searching for something similar that was free with no success.  So I broke down and purchased it.  It is called the Chouette and is also available on Ravelry.  The pattern calls for a chunky weight yarn, but I just held two strands of  Red Heart yarn together throughout.  I didn't get around to adding the button eyes before Christmas though.  This is definitely a warm hat!


This was my big project this Christmas season.  My oldest saw these all over social media and requested it for Christmas.  This one is crocheted and used 6 skeins of yarn (2 of each color).  If you can work a dc you can make this.  The designer even did a YouTube video for those who struggle with written directions!  It is a freebie also and can be found here.


My current projects include adding crochet edgings to fleece blankets that will be donated to a local foster care group and a knit shawl.  Oh how I have missed crafting!

Monday, March 16, 2015

Spirals pattern

Another free pattern for you.  This one is easily adapted to any yarn or size.  I'll give the pattern for a newborn size as I have made and at the end I will include directions to adjust.


You will need:
Light yarn #3   I used Bernat Baby Sport Yarn, Funny Prints
4.25 mm  G/6  hook
stitch marker

sc = single crochet
dc = double crochet
ch = chain
BLO = back loop only
FPDC = front post double crochet
BPDC = back post double crochet

Pattern:
You will be working in the round, not joining rounds.  Place marker at the beginning of each round

r1 - 6 sc in magic circle

r2 - in BLO (back loop only)  2 sc in each sc.  (12)

r3 - in BLO *2sc in first sc, sc in next.  Repeat from * around  (18)

r4 - in BLO  *2 sc in first sc, 1sc in each of the next 2 sc.  Repeat from * around.  (24)

r5 - in BLO  *2 sc in first sc, 1 sc in each of the next 3 sc.  Repeat from * around.  (30)

r6 - in BLO  * 2sc in first sc, 1 sc in each of the next 4 sc.  Repeat from * around.  (36)

r7 - in BLO  *2 sc in first sc, 1 sc in each of the next 5 sc.   Repeat from * around.  (42)

r8 - in BLO  *2 sc in first sc, 1 sc in each of the next 6 sc.  Repeat from * around.  (48)

r9 - in BLO  *2 sc in first sc, 1 sc in each of the next 7 sc.  Repeat from * around.  (54)

r10-18 - in BLO  sc in each sc around.  (54)

r19 - in BLO, dc in each stitch around.  Join to first dc  (54)

r20 -  ch 2, *FPDC , BPDC   Repeat from * around.

fasten off and weave in ends.

Adjustments for this are super simple.  Choose your yarn and a hook of the appropriate size for your yarn.  Measure the circumference (around) of the head the hat will be worn on.  Divide by 3.14.   Write this number down.

Begin pattern above.  After each round measure across your work.  When it reaches approximately the number you have written stop the increase rounds.  If necessary, continue the pattern set in r1-9 to continue increases.  (2 sc in first sc, 1 sc in each of the next 8 sc,  adding to the underlined number each round)  Once you have reached the end of your increase rounds simply begin working the sides by working one sc in each sc around (r10) until about 1 inch before the desired length.  Then work r19 and r20.

Until next time,

Wednesday, April 2, 2014

Football hat

In my search for some cute hats to make for the boys I kept coming across hats designed to look like balls - especially a football.  I found a free one and gave it a go only to have it turn out oddly shaped and WAAYYYY to big despite being a "newborn" size.  So I again decided to play around and this is what I came up with.  It received Mr. Sunflowers seal of approval as well as the mini sunflowers.


You will need:
Crochet Hook, Size I, 5.5mm
Red Heart With Love, Chocolate
Red Heart With Love, White

Directions:
start with a magic ring,

r1 - ch 2 (does not count as a dc in the pattern),  12 dc in ring.  pull tight.  join to first dc

r 2 - ch 2, work 2 dc in each stitch around.  join to first dc.  (24 dc)

r3 - ch 2, *2dc in stitch, dc in next stitch repeat from * around.  join white yarn, join to first dc (36)
 * I do not cut the brown yarn, rather I work the first dc of the next row around the tail and let it hang.  When I begin r5 I just pick it up again.  less ends to weave in ;)

r4 - ch 2, dc in each stitch, join brown yarn, join to first dc.  cut white yarn (36)

r5-9 - ch 2, dc in each stitch around, join to first dc (36)  at the end of round 9 join white yarn

r10 - ch 2, dc in each stitch around, pick up brown and join to first dc.  cut white yarn (36)

r11 - ch 2, hdc in each stitch around, join to first hdc (36)

r12 - ch 1, sc in each stitch around, join to first sc. fasten off and weave in all ends

to make the lacing:
with white chain 7 leaving a long tail at the end.  position chain in the large brown section between the white rounds vertically.  use the tail to secure the chain to the hat and to sew 3 bar lines across.  weave in ends.

Until next time,

Friday, March 28, 2014

Princess Crown

Almost 2 years ago I created this cute little tiara designed by Sarah of Sarah Sweethearts as a last minute gift for my princess when she turned 4.


This year, when a family friend's daughter had her princess birthday party, I knew just what to make!  I love that it works with any headband, allowing me to pick one that doesn't SQUEEZE the head to tightly.  I also like that it is flexible.  My princess has a habit of being a bit rough on her tiaras and they inevitably end up in pieces.  Short of taking scissors to this one or pulling it off of the headband, this one lasts for a LONG time.  Using size 3 thread gives it just the right amount of stiffness.  I decided to give this tiara a little glitter by adding Enchant Yarn in King's Crown.


The best part.....it takes less than 30 minutes to create!  You can get the pattern from Sarah's Ravelry store here.

Until next time,

Sunday, March 23, 2014

40 in 40 (2014) week 3

Lot's of cute patterns this week, including one that I created accidentally in an attempt to modify another.  Let's get started!

First is this cutie from Alice and the Mock Turtle called the Itty Bitty Bow Beanie.  I love the cute little bow on it.  This example worked in grey and purple Simply Soft yarn  looks so sophisticated in my opinion. Super simple to work up.


Next is the Sweet Striped Crochet Hat from Tamara Kelley.  It is available in sizes infant to adult.  It can easily be made for a boy or a girl and since it uses a size I hook and worsted weight yarn it is a quick project.  It has an interesting pattern as you can see:


But the joins make that part look a bit sloppy.  Of course, that could just be me.....


Then there is the Newborn Baby Girl Hat designed by Tanya Lapatsina available as a free Ravelry download.  


As you can see, this is a bit small for a newborn hat, but would probably fit a preemie.  I really like the leaf design on the hat, but stretched like this to fit a newborn head it just seems to be oddly sized.  If I make it again I would add another 6-8 stitches to the foundation row and a few more rounds to add some height.  

Then I tried to work a pattern in the round that was written to be worked flat.  Had some trouble with it and ended up just doing my own thing, which led to the Unisex Reversible Baby Hat pattern.  I'll give the original pattern another try next week....


It's available in multiple sizes from small preemie to 12 months.

Then I made the Camilla Babe Hat designed by Cathy Payson.  I cast on 51 stitches to give me a newborn size and adjusted the pattern repeats.  I worked in the pattern until the hat was about 4.25 inches and then began the decreases.  I love the Patons Beehive Baby Sport yarn I used in this pattern.  It is so and light!


And the final hat this week, the Textured Baby Hat from Sarah Al-Amri.  Also available as a free Ravelry Download.  I chose to work it in 2 colors.  This one is my husband's favorite hat so far.  


And that's it for this week.  Still looking for some cute boy patterns....

 Until next time,

Saturday, March 22, 2014

Unisex, reversible baby hat

This pattern was the happy accident of my attempt to modify one of the patterns I was making for this years "40 in 40" challenge.  I was using Marianna's Premature Unisex baby hat pattern and decided to work it in the round rather than on straight needles.  It wasn't until I began the decreases that I realized the difference between what I was making and the original pattern.  So this isn't so much an original creation, more a modification.  Still, I thought I would share with you in case you might like it too.


Yarn - Caron Simply Soft
Needles - Size 6, 4.0 mm

Guage    22sts = 4” (10cm)
 
Small Preemie Baby  –  7″ circumference, 3 ½“ high

 Brim (can be worked in a contrasting color) ~  cast on 35

Rnd 1 - knit to end of row
Rnd 2 - knit to end

Rnd 3:  knit to end of row

Rnd 4: * k2, p3   repeat from * to end

Repeat the last row until work measures 2“, 

Shape Top ~
rnd 1:   * k2tog, p3, repeat from *   
         
rnd 2-4:  * k1, p3   repeat from * to end

rnd 5:   *k1, p2tog, p1   repeat from * to end

rnd 6: * k1, p2   repeat from * to end

rnd 7: * k1, p2tog   repeat from * to end

rnd 8: * k1, p1   repeat from * to end

rnd 9:   * p2tog to end

cut yarn and run it through remaining live stitches.  Pull tight and weave in all ends


Medium Preemie Baby  –  9″ circumference, 4 ½“ high
 
Brim (can be worked in a contrasting color) ~  cast on 45

Rnd 1 - knit to end of row
Rnd 2 - knit to end

Rnd 3:  knit to end of row

Rnd 4: * k2, p3   repeat from * to end

Repeat the last row until work measures 3“, 

Shape Top ~
rnd 1:   * k2tog, p3, repeat from *   
         
rnd 2-4:  * k1, p3   repeat from * to end

rnd 5:   *k1, p2tog, p1   repeat from * to end

rnd 6: * k1, p2   repeat from * to end

rnd 7: * k1, p2tog   repeat from * to end

rnd 8: * k1, p1   repeat from * to end

rnd 9:   * p2tog to end

cut yarn and run it through remaining live stitches.  Pull tight and weave in all ends
 
 
Large Preemie / Small Newborn  –  11″ circumference, 5 ½ “ high
Brim (can be worked in a contrasting color) ~  cast on 55

Rnd 1 - knit to end of row
Rnd 2 - knit to end

Rnd 3:  knit to end of row

Rnd 4: * k2, p3   repeat from * to end

Repeat the last row until work measures 4“, 

Shape Top ~
rnd 1:   * k2tog, p3, repeat from *   
         
rnd 2-4:  * k1, p3   repeat from * to end

rnd 5:   *k1, p2tog, p1   repeat from * to end

rnd 6: * k1, p2   repeat from * to end

rnd 7: * k1, p2tog   repeat from * to end

rnd 8: * k1, p1   repeat from * to end

rnd 9:   * p2tog to end

cut yarn and run it through remaining live stitches.  Pull tight and weave in all ends
 
 
Newborn Baby  – 13″ circumference, 6″ high
 
Brim (can be worked in a contrasting color) ~  cast on 65

Rnd 1 - knit to end of row
Rnd 2 - knit to end

Rnd 3:  knit to end of row

Rnd 4: * k2, p3   repeat from * to end

Repeat the last row until work measures 4.5“, 

Shape Top ~
rnd 1:   * k2tog, p3, repeat from *   
         
rnd 2-4:  * k1, p3   repeat from * to end

rnd 5:   *k1, p2tog, p1   repeat from * to end

rnd 6: * k1, p2   repeat from * to end

rnd 7: * k1, p2tog   repeat from * to end

rnd 8: * k1, p1   repeat from * to end

rnd 9:   * p2tog to end

cut yarn and run it through remaining live stitches.  Pull tight and weave in all ends

 
9 – 12 month Baby  – 15″ circumference, 7“ high
 
Brim (can be worked in a contrasting color) ~  cast on 75

Rnd 1 - knit to end of row
Rnd 2 - knit to end

Rnd 3:  knit to end of row

Rnd 4: * k2, p3   repeat from * to end

Repeat the last row until work measures 5.5“, 

Shape Top ~
rnd 1:   * k2tog, p3, repeat from *   
         
rnd 2-4:  * k1, p3   repeat from * to end

rnd 5:   *k1, p2tog, p1   repeat from * to end

rnd 6: * k1, p2   repeat from * to end

rnd 7: * k1, p2tog   repeat from * to end

rnd 8: * k1, p1   repeat from * to end

rnd 9:   * p2tog to end

cut yarn and run it through remaining live stitches.  Pull tight and weave in all ends


Until next time,

Sunday, March 16, 2014

40 in 40 (2014) week 2

Here are this week's hats and pattern links.  I'm having a hard time finding hats for boys that don't all look the same.  I'd like to do some that are unique in which the pattern and design are interesting without looking girly.  I can easily take a basic beanie and use blue yarns, but where is the fun in that?  If you have an idea, please share!

On with the show.....

Saturday's hat was the Cuddles DK Cabled Knotted Hat by Cathy Campbell.  It was the first time I have ever attempted at 3 needle bind off.  I think it would have gone better had I put the stitches on straight needles rather than trying to use the short double ended needles I used to work the hat in the round.  Still, a cute hat that can easily be made for a boy or a girl depending upon your yarn choice.


Monday's hat was the The Baby Scale by Cathy Woods.  It looks a lot like the Crocodile stitch that seems to be so popular now, but it is simply a shell pattern with some fpdc's to make them pop out.  If you grab this pattern from Ravelry, note that it says to use an E hook.  I found that to be WAY to small for even a preemie and switched to the 4.0 hook called for in the pattern.  I also had to omit rounds 12-15 to get a newborn height.

The one thing I didn't like about this pattern is the shift from the crown to the pattern stitches.  There is a definate "bump" transition.  I may play with the pattern in the future to see if I can figure out a way to start the shell pattern from the center out to avoid this.


Tuesday's hat was the Madison by Becca Sheffler.  This is another hat that can be made for either a boy or a girl depending upon your yarn choice.  The 2 stitch cables worked throughout the hat give it an interesting texture and yet it is still a very simple hat.  I used size 7 needles, only CO 72 stitches and only worked 15 rounds before beginning the decreases and still ended up with more of a 3-6 month size rather than newborn.


Wednesday's hat was the Hat in a Hurry by Thomasina Cummings.  I used Naturally Caron Country yarn in coral for this one.  I LOVE this yarn as it is soft and the color is vibrant.  The pattern offers both a boys and girls edging making this yet another unisex hat.  I loved the picot edge for the girl.


Thursday's pattern was one of my own, the Shells and Vines hat.  You can find it here.  I designed this one to match one of my sweater patterns available here.


Friday's pattern was the Wrapped Stitch Baby Hat for Straight Needles designed by Heather Tucker.  I don't like to seam, so I omitted one stitch on each row and worked in on my double pointed needles.  Again, the hat turned out a bit large for a newborn.  Still, this was my first time working a pattern with wrapped stitches.  It is an interesting design feature, if a bit time consuming.


 I liked the crown shaping on this one too.


And the final hat this week, the Emery Beanie by Stephanie MacDerment.  Although the pattern says it was for newborns, I ended up with a preemie size.  I used the flower pattern suggested and worked two petal rounds.  It yields a really stiff flower.


Until next time,