We had our first frost of the year last night. I love the pattern it makes on the windows of the van. I almost hated having to warm the van and watch the beautiful patterns dissappear to take H and J to school this morning. (I say almost because while beautiful, I like warmth also!) I can't believe that it is fall already! Which got me to thinking...
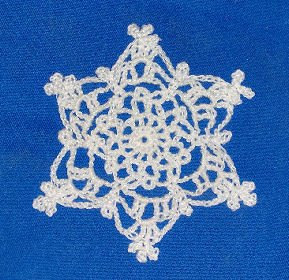
Christmas is only 63 days away!!! With money being especially tight this year that means it is past time to start crafting! I have decided to make snowflake ornaments to include with my Christmas cards this year. I think this will make them more personal, they are relatively quick and inexpensive to make, and they make a great gift for those people that you recieve a gift from but didn't buy a gift for. As an added bonus, they look like they took forever to non-crafters!!
I prefer the thread crochet versions and there are several patterns available for free on the web that are beautiful. I plan to make one a day, and today's snowflake will be an original design by who else? ME!!!
FROSTY the SNOWFLAKE

You will need:
steel crochet hook size 8
size 10 crochet thread
stiffening medium of your choice (starch, sugar, glue etc)
I use the magic circle to begin my snoflakes because I like a tight center. To do this you wrap the thread around one finger 3-4 times, then draw a loop up through the circle you have created. After your first round is completed, pull the tail string tight to close the circle. You can then weave this end into the design when it is completed. If you prefer, you can chain 2 and use the first single crochet as your center.
R1: 12 sc in circle (or first sc if not using the magic circle method), join to first sc
R2: ch 4(counts as first dc, ch 1), * dc in next st, ch 1 Repeat from * 10 times. Join to 3rd chain of the ch 4. (12 dc, 12 ch 1 spaces)
R3: slip stitch into first ch 1 space, ch 1, sc in same space, * ch 5, sc in next ch 1 space Repeat from * 11 times, ch 2, dc in first sc to join. 12 sc, 12 spaces
R4: ch 1, *(sc, ch 3, sc) all in same space, ch 3, dc in next ch 5 space, ch 3 Repeat from * 4 times. (sc, ch 3, sc) in next ch 5 space, ch 3, dc in next ch 5 space, ch 1, dc in beginning sc.
R5: ch 1, sc in same space, *ch 9, skip next ch 3 space, sc in each of next 2 ch 3 spaces(one on each side of dc of previous row). Repeat from * 4 times. Ch 9, skip next ch 3 space, sc in next ch 3 space, join to first sc. (6 ch 9 spaces)
R6: ch 1, *sc in space between the 2 sc of previous row, ch 4, work 2 trc, ch 2, 2 trc in ch 9 space of previous row, ch 4 Repeat from * 5 times. Join to first sc
R7: ch 1, *sc in sc of previous row, ch 5, sl st in sc, ch 5,{2 trc, (ch 5, sl st to first ch) 3 times, sl st to last trc, 2 trc} in next ch 2 space, ch 5 Repeat from * 5 times. Join to first sc. Fasten off and weave in ends
Stiffen using your desired medium and method
I have had a couple of people request that I write R7 in "plain english". I know how frustrating it can be for a beginner to come across a pattern they want to try and get most of the way through it only to be stumped by pattern shorthand. So here is R7 in plain english:
*single crochet in single crochet of previous row, chain 5, slip stitch in single crochet, chain 5
After the ch 5 you will be working in the next chain 2 space. ALL within this space you will work the following:
2 triple crochets, chain 5, slip stitch to the first of these chains to
create a picot. chain 5, slip stitch to the first of this set of chains to
create a second picot, chain 5 and slip stitch to the first of this set of chain
5 to create a third picot. slip stitch to the second triple crochet that you
made to secure this set of 3 picots in place. Work 2 more triple crochets.
This is what is within the {} on the pattern. From this point, you will chain 5 and begin again at the “sc in sc of previous row” (where the * is) 5 more times. This will give you a set of 3 picots at every point of the snowflake and a small picot at the midpoints.
This is what is within the {} on the pattern. From this point, you will chain 5 and begin again at the “sc in sc of previous row” (where the * is) 5 more times. This will give you a set of 3 picots at every point of the snowflake and a small picot at the midpoints.
I hope that this helps you to finish your snowflakes. Blessings!
This work by Ginny Blankenship is licensed under a Creative Commons Attribution-Noncommercial-Share Alike 3.0 United States License.
